Showing posts with label banner. Show all posts

Thursday, June 12, 2014

Create for summer...


In my never-ending effort to have a year-ful of seasonal decorations (all hand-made by me), I am finally feeling like it is time to recognize summer.  My last day of school is tomorrow and I am THRILLED--ready for some relaxation and a whole lot of nothin'.

So, to celebrate...I used these banner shapes from Unique Laser Designs.  I covered them with patterned paper (from Close to My Heart) and added burlap letters, a vellum die-cut doily shape, and more wood summer shapes all from Unique Laser Designs.  


I colored the shapes (the cute bee, flowers, stars, ladybug, and watering can) with Copic markers.  I LOVE how the natural color of the wood softens the colors from the markers so that you get a subtle intensity.

For these daisies below, I covered them in white ink and then dipped them in UTEE a couple times to get an extra-thick shine.  I added clear buttons and white twine and I think they just scream SUMMER!


So, what are you screaming now that summer is finally arriving?
How about, "Can I have more crafty time please?!"

Don't forget, Unique Laser Designs is looking for their next design team---it could include YOU!
Check out the info HERE
~Kelly


Pin It


Monday, March 17, 2014

Create for MORE birthdays...


March is a busy month at the Starsky house.  Three birthdays, including mine.  Unique Laser Designs is a new company, and they sought out some help from the Scrap It Girl Design Team to get the word out about their new web site and plethora (I like that word) of laser cut shapes.  They sent us all some free samples to play with and we are having a fabulously creative time!

When I saw these wood shapes, I was eager to make a birthday banner that we can leave up all through the spring as we celebrate even more family birthdays.


Here are the shapes all naked.  They smelled fantastic!


I added some black Ranger acrylic paint and Tim Holtz Picket Fence Distress Stain and then splattered some apple green paint on top and lastly edged with some turquoise.  These were covered in just a couple of thin coats of paint/stain because I wanted the grain of the wood to show through.


For the 3-piece wood cupcake from Unique Laser Designs, I painted the base and frosting with an orange paint marker.  I used a Tim Holtz Sizzix rosette strip die (but didn't make a rosette) to look like the cupcake liner.  To the frosting shape, I spread some glue on top and then sprinkled white Flower Soft and seed beads. The cherry on top...a layer of ruby glitter glue.

I added some strips of birthday patterned paper and used the Tim Holtz Sizzix rosette strip die (to really make rosettes this time) as a base for each letter in BIRTHDAY (those letters are from Unique Laser Designs too).  I punched some circles and folded them over the metallic yarn I used to string all of the shapes to make this long (very long) banner seen below.

Unique Laser Designs keeps adding more and more shapes to their collection.  I have a cart started, and every time I think I am ready to complete my order she (Shilo, the owner) starts teasing us on Facebook with more shapes that are coming.  Not only are these shapes a great addition to home decor (and VERY reasonably priced), but they are really thin and perfect for scrapbook pages and cards without adding a lot of bulk to the project.  I like my scrapbook pages flat, but I wouldn't hesitate to add one of the small shapes to a page and still feel like it would slide into a page protector without difficulty. 

I have a lot more goodies to play with and I am thinking "spring"...even though it certainly doesn't feel like it here in Wisconsin.  More snow this morning...ugh!
~Kelly


Pin It


Thursday, March 21, 2013

Be hoppy...

 
Sometimes being "hoppy" takes a lot more effort than it should.  It's been a rough few weeks around here and the snow and cold that are still on the ground (despite the fact that the calendar says that it is the middle of March) are not helping.
 
A little time in the craft dungeon does make me "hoppy".  Doubly "hoppy" in this case.  Fiskateers hosted a mini-crop over the weekend.  I was only able to get 2 challenges done.  The first one, seen above, was a "Kermit" challenge.  In other words, use a frog in your project.  I had to wrap a gift for a wedding shower and had NO wrapping paper besides Christmas.  So, I turned some plain Kraft wrap into something "hoppy".  I used the Fiskars Funky Heart squeeze punch to create the big, dimensional flower. 

 
Since I was digging around in my scrappy stash of goodies and found 2 frogs for Challenge #1, I decided to use the other frog for Challenge #2-Somewhere over the Rainbow.    I used my Fiskars Banner Year XXXL Lever Punch to cut perfect triangles out of these scraps.  Ribbit--little froggy is poking out from behind to wish someone a "hoppy" birthday.

Hope it is warming up where you are and you find some ways to "be hoppy".

~Kelly


Pin It


Friday, July 27, 2012

whatever I love and whatever I don't...


Things I love about this layout...

-these patterned papers from Authentique's line, Genuine.  I could wallpaper my house in these papers--and I don't usually love a whole collection, but with this one, every sheet makes me happy. 
So, Authentique, if you are listening (or watching or looking or reading), how about starting a line of wallpaper?

-the yellow polka dot paper from Close to My Heart...
polka dots make me happy too

-the sandpaper I used to cut out the letters in BEACH. 
Guess what they remind me of?  SAND, sandpaper, get it?

-the pattern from this grid stamp (from Stampin' Up) that I stamped with clear embossing ink under the glitter

-the triangle banners at the top of the layout, with the twine underneath. The shape is from Fiskars new XXXXL "Banner Year" Lever Punch. I had previously questioned why I would need a punch that makes triangles when they really aren't that difficult to hand cut, but let me tell you...pop, pop, pop--3 triangles all the same size in 3 seconds, I was wrong...I LIKE it!

-the white lacy leaf from Kaisercraft tucked under the right side of the photo

-this cute photo of my son sitting in one of the many holes in the sand that he made that day

-the mini alphabet, Tiny Type, stickers from Cosmo Cricket--
I could collect these in every color!

-the compass overlay from Me and My Big Ideas that is to the right of the photo

-that this "Quilt Block of the Month", it's #7, from Smitha Katti over at the Fiskars site is much easier to replicate in paper than #6 that had me tearing up over triangle cutting and placement. (I'm exagerrating a little...but just a little).

-did I mention the papers from Authentique? 
Oh, so worth mentioning again.

-the sparkly gold glitter, with that grid pattern, ooh la la!
In Florida, the sand really is sparkly!


OK, now things I don't like about this layout...

there is just one...

-the sparkly gold glitter

Oh, did you notice the sparkly gold glitter ended up on both lists?
(I bolded it for you just in case you didn't notice). 

Actually, that sparkly gold glitter ended up on my barefeet, on the photo, on my fingers, on my clothes, in my hair, all over my scrap dungeon, on my camera, on the front porch (where I took the photo of the layout), do you get the idea? 

I am reminded why I don't like glitter and why I don't use glitter.  I tried that old high school art class trick of spraying hair spray over the glitter to help it set--didn't work.  Maybe I need to use super duper Aqua Net, circa 1987?


Oh well, this layout is one of my favorites. 
So much so, I could almost forgive and forget about the glitter. 

Almost.

Hope you have a sparkly day!

~Kelly

Pin It


Monday, February 13, 2012

Whatever is loved...

Banners are one of my favorite things to make, but one of my least favorite things to take a photo of. At home, I hang banners between the dining room and kitchen. When it is hanging, it is not a great photo opportunity because you get the distracting background of the windows and the curtains or the front door. If I put it on the floor, you see all of the dust bunnies and muddy dog and kid footprints. On the dining room table (which is what I did), I have to stand on a chair and try to avoid the overhead light (which was needed since it is cloudy and snowing right now). Ugh! The things we all go through to get a decent photo.

But onto the banner...
I pulled out everything pink, red, and Valentiney.  The background paper is from We R Memory Keepers (Love Struck).  The, stickers, material, paper doilies, and ribbon are a mix of old and new. I used some old, unwanted CD's as the circle base for the letters, and then covered them in patterned paper. I embossed the letters and then Stickled along the pattern for a little more pizazz. I tied on the strips of ribbon and material (this is the time-consuming part) during some TV time. Multi-tasking...I love it.

Love You...for taking the time to visit.
Enjoy your Valentine's Day with your loved ones.

~Kelly


Monday, October 11, 2010

Pick-a Pick-a Pumpkin from the pile...and a "banner" Halloween


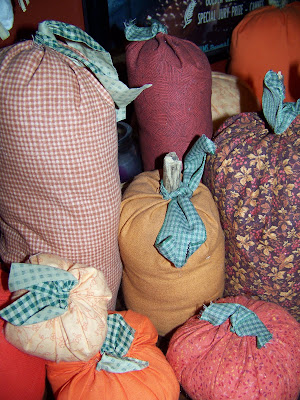
I made these pumpkins about 5 years ago, and even though they get squished into a plastic bin for storage after Halloween every year, they've held up very well. Except a few have gotten their "stem" pulled out by a Golden Retriever I know that likes to chew on sticks (we should have named him "Chip").

They are "sew" easy...I thought I would share them with you.

I start by using a bowl or template to draw a circle on some material, and then cut out the circle (I like to use pinking shears to avoid the un-ravelling edge).


I take a needle and thread and do a quick running stitch (in, out, in,out) all of the way around the edge. No need to be perfect here...no one will see your stitches.

I add a little "filling", pull the thread, add a stick for a stem, and tie it up.

I add some ribbon scraps for leaves/vines. After I've made a few pumpkins, in all different patterns, I take 3 or 4 and hot glue them together.

I've made my own pumpkin patch for a fall display in the family room and around the flower centerpiece on the dining room table. Let me see your pumpkin patch!

Fall is in the air, literally, in the air, hanging between rooms...I made this 2-sided Halloween banner for a challenge over in Fiskateerland a few weeks ago. I hung it up and was happy, but it just needed something more. I decided to tie on some scraps of fabric cut into strips, and now it is complete!

Thursday, April 8, 2010

Butterflies, babies, and Daughtry


Still working on getting ready for the baby shower...countdown 3 days now. I finished and hung the banner yesterday. The other side is still blank so I can add baby girl's name after she is born and they can hang it in her room. Going to get the diaper cake done today.


Last night, my birthday present from my hubby was to see DAUGHTRY in concert. It was fabulous. Great opening act by Lifehouse too. I think my hearing is finally starting to come back now. Thanks hubby, I had a fabulous time (like he would ever come and read my crafty blog). Found this great photo on the web...