Showing posts with label birthday. Show all posts

Tuesday, August 19, 2014

Create for a birthday, a birthday, and school


August---full of birthdays and then onto eeeek--"school".  The mere mention of it sends shivers down my spine.  But, I will acknowledge its upcoming presence by the end of  this post.  First, I just wanted to share a few quick cards with you that I made using the Polaroid frames from Unique Laser Designs.  Yes, you can use them to frame a photo, but look how cute they are on a card!

On this ice cream card, I colored the frame with a creamy metallic silver gelato.  The little hexagon is colored with a sparkly gel pen. Did you guess that the scoop of the ice cream is really a cloud? I'm so sneaky!  I colored that with a Copic marker and then swirled Stickles (rock candy)on to make it sparkle.


I know I showed you this card already, but I'm showing it again to remind you to join in the Scrap It Girl challenge for August---use an arrow or a # on your project.  More details are HERE.  

Hexagons are the theme for this card.  I dry embossed a hexagon pattern on the card and then added a Polaroid frame again---this time I used a paint marker to color it black. The small wood hexagons with the sentiments-- I rubbed on different ink pads, just like I did the cute bee (see below)---easy easy easy and quick! 


I used a Sharpie to color the black stripes on the bee and then covered it (really thick) with a layer of Stickles (rock candy again). It looks like a suncatcher--so crackly and sparkly at the same time.

Now, onto school. We are being extra creative with Back to School ideas on the Chicagoland Scrapbooker blog.  Something new every week during August.  My daughter is going to be in 5th grade and is SO excited to find out who her homeroom teacher will be.  To celebrate that first day of school, I used a Unique Laser Designs ATC card and made a chalkboard by painting on a few layers of chalkboard paint before adding some die-cut letters and leaving some room to write with chalk.  The soda stamp is from Unity and I stamped it with glue from the Rubber Cafe and then sprinkled on extra fine glitter.  Sparkly goodness!  A few strings of twine hot-glued onto the back and it's ready to hang around a soda bottle. Now, it's re-usable and her teacher can pass a message on and  be "soda-lighted" for someone else (for a birthday, a great test score, a travelling award around the classroom).


Hope you are "soda-lighted" with these projects that you are feeling inspired to celebrate a birthday, a birthday, and school!

The birthdays, I'm ready for!  School---not so much.
Enjoy these last few weeks of precious summer.


~Kelly
Pin It

Wednesday, June 25, 2014

Create big wishes on a small card...


Dropping in with some cards that are "small in size, but BIG on wishes" today.  We have been celebrating June with birthday inspiration over at the Chicagoland Scrapbooker blog.  There have been great birthday ideas all month long and I am showing these cards to finish off the month (eek, it's July next week).   For all of these cards, I used small wood embellishments from Unique Laser Designs.  They all started with a card base of kraft paper that is 4"x4" inches (when folded).  I used washi tape as the background (SO quick and easy), and then colored my wood embellishments with Copic markers.  I added a layer of Glossy Accents to give them a shiny dimension.  I LOVE this bird on a branch---he is simply cute!


For this turtle card, I colored him with Copics, popped on a googly eye, and then added a layer of sparkly green micro-glitter.  For those birthdays you (almost) forget...the outside reads "this birthday card is not late", the inside says "it's just slow". 


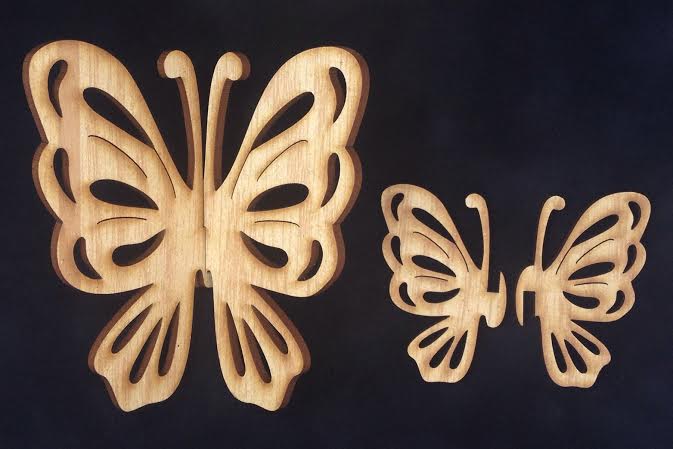
I pushed colored clay into the spaces in this 3D butterfly and then blinged it out with some Glossy Accents and glitter glue on the antennae.


Do you recognize that sentiment below the butterfly?  


This 3 piece cupcake is sweet and looks good enough to eat!  I used white ink to color the frosting, Copic markers for the cherry, and an icing of Glossy accents sprinkled with micro-beads.


These wood shapes make these cards come together SO easily--I think I'm going to make a bunch!


  ~Kelly

Pin It

Tuesday, April 29, 2014

Create and play tag...


Chalk art is hot, hot, HOT right now, and I am incorporating some wood tags from Unique Laser Designs into the trend.  


I covered the tags with 4 coats of  chalkboard paint and let them dry for a few hours.


To decorate and give them that "chalkboard" look, I used white acrylic paint and a white gel pen.  You can also spot that there is an adorable red heart from Unique Laser Designs that I pre-colored/scratched with a burgundy gel pen and then pressed into a red ink pad.  The "mom" and the "Jennifer" on these tags are written with real chalk and can be erased and re-used.  So cute and perfect timing for Mother's Day--don't you think?  I'm going to hang that "I (heart) Mom" tag on a big hanging basket of flowers for my mom.

Have you made your mom something yet?

~Kelly

Pin It

Monday, April 14, 2014

Create what fools the eye...


Who says that you can't celebrate April Fools Day during the whole month of April?  Over at the Chicagoland Scrapbooker blog today, I am fooling everyone with this faux-leather technique.  

It is easy peasy.  All you need is cardstock, ink, and plastic wrap.  I told you it was easy!  Squish up your plastic wrap, dab it on your ink pad, and then stamp it onto your cardstock.  The card on the left is Iced Spruce Distress Ink on gray cardstock and the card on the right is Chocolate Chip Ink from Stampin' Up on brown Kraft paper. I created the shading just by adding more or less ink and varying the pressure when I stamped.


This adorable bike is from Unique Laser Designs.  I just pushed the bike into an ink pad to get some distressed color on it.
Since I needed a masculine birthday card, I decided to hide the basket behind the cutout on my card window.  I added a clock stamp and the sentiment "time for another birthday?"...inside it says "enjoy the ride".

Have you checked out the Unique Laser Designs website yet? What are you waiting for?  Also, there is a challenge for the month of April.  You can play whether or not you have ordered from them yet?  Just show us your creation with a wood or chipboard embellishment.  You can find all of the information HERE.

Enjoy the ride!
~Kelly


Pin It

Monday, March 17, 2014

Create for MORE birthdays...


March is a busy month at the Starsky house.  Three birthdays, including mine.  Unique Laser Designs is a new company, and they sought out some help from the Scrap It Girl Design Team to get the word out about their new web site and plethora (I like that word) of laser cut shapes.  They sent us all some free samples to play with and we are having a fabulously creative time!

When I saw these wood shapes, I was eager to make a birthday banner that we can leave up all through the spring as we celebrate even more family birthdays.


Here are the shapes all naked.  They smelled fantastic!


I added some black Ranger acrylic paint and Tim Holtz Picket Fence Distress Stain and then splattered some apple green paint on top and lastly edged with some turquoise.  These were covered in just a couple of thin coats of paint/stain because I wanted the grain of the wood to show through.


For the 3-piece wood cupcake from Unique Laser Designs, I painted the base and frosting with an orange paint marker.  I used a Tim Holtz Sizzix rosette strip die (but didn't make a rosette) to look like the cupcake liner.  To the frosting shape, I spread some glue on top and then sprinkled white Flower Soft and seed beads. The cherry on top...a layer of ruby glitter glue.

I added some strips of birthday patterned paper and used the Tim Holtz Sizzix rosette strip die (to really make rosettes this time) as a base for each letter in BIRTHDAY (those letters are from Unique Laser Designs too).  I punched some circles and folded them over the metallic yarn I used to string all of the shapes to make this long (very long) banner seen below.

Unique Laser Designs keeps adding more and more shapes to their collection.  I have a cart started, and every time I think I am ready to complete my order she (Shilo, the owner) starts teasing us on Facebook with more shapes that are coming.  Not only are these shapes a great addition to home decor (and VERY reasonably priced), but they are really thin and perfect for scrapbook pages and cards without adding a lot of bulk to the project.  I like my scrapbook pages flat, but I wouldn't hesitate to add one of the small shapes to a page and still feel like it would slide into a page protector without difficulty. 

I have a lot more goodies to play with and I am thinking "spring"...even though it certainly doesn't feel like it here in Wisconsin.  More snow this morning...ugh!
~Kelly


Pin It


Monday, March 3, 2014

Create for a birthday...


Birthdays are popping up all over this month.  Now, if only spring was popping up all over.  I created this treat jar for a co-worker and it allowed me to play with lots of supplies for lots of reasons.

First, I am the hostess for the March challenge over at Scrap It Girl.  Easy-peasy...just show us a birthday creation...card, page layout, poster, treat jar, home decor, whatever.  You could win the fun prize pack, seen HERE.

Second, I did some production packing for Bella Blvd and received a truck load of fun items.  I used patterned paper from the new Lucky Stars, Freestyle, and Molly collections, and you can spy some washi tape, alpha stickers, Family Forever Candid Cards, etc.  I mixed and matched and just wanted this to be a bright, party explosion.

Third, we are celebrating March Madness this month over at the blog for Chicagoland Scrapbooker.  We all tend to go a little "mad" over something in our craftiness.  Me--it's distressed edges.  I think roughing up the edges of paper just gives the right amount of dimension and texture.  I tend to like my page paper projects flat so they can slide into an envelope or page protector easily.  Distressing the edges gives some "pop" without anything popping and falling out and making my cards undeliverable and my albums too wonky.


So, what are you crafting while you wait for spring to show up?

~Kelly


Pin It

Monday, January 27, 2014

Create a celebration...


Just a quick post as I settle into hibernation mode in the craft dungeon.  "Polar vortex" (come on, who thinks of these?) again here in Wisconsin with wind chills in the minus 40s for today and Tuesday.  One of my continuing "art-ventures" in 2014 is as a Design Team member for Linnie Blooms.  Linda Barutha, Linnie Blooms owner, is spreading the wings of her business and is now selling her canvas mixed stitch media products through her own creative reps.  You can see the catalog of goodies here
and find a rep to host your own art creation party here.

 
Today, I played along with the January sketch challenge.  I used a 5x5 Linnie Blooms canvas blank as a background for layering some birthday wishes.  I created the dotted background by just letting my Copic markers seep into the weaving for a moment. 
 
I think that so often people are afraid to be crafty or artistic because they think they need to spend a lot of time on their creation.  Sometimes, simple and quick is just enough to get a few moments of relaxation.  A simple hand-made card is so appreciated by the recipient.  It shows that you will take time out of your busy chaos to let this person know that they are special enough to receive something hand-made and one of a kind.  Now, that is a gift!
 
So, what are you going to create in your 10 minutes today? 
 
Don't forget that you can play along with the Linnie Blooms sketch challenge right HERE until January 31st.


~Kelly

Pin It


Thursday, February 7, 2013

Be efficient...


I'm not always the most efficient when I am away at a crop.  Between chatting with friends and feeling like I'm going to want something that I left at  home (despite overpacking and bringing a ton of "stuff"), I don't always get a lot done. 

 
If I had a plan, instead of throwing supplies in haste an hour before I leave, maybe I would be more efficient.  


This past Saturday was a little different.  I got quite a few pages done and then was inspired to be really efficient.  I used a birthday paper pad from My Mind's Eye and this cute owl stamp from Close to My Heart to create 10 cards in a jiffy.


They were all inspired by the design of this card above that we created at the Make and Take table.  My daughter will love all of this glittery goodness as her valentine!
~Kelly
Pin It

Sunday, May 29, 2011

Birthday treats


Who wouldn't want to receive this jar as a special birthday treat? I don't think I can fit cupcakes in there even though there are these cute ones on it, complete with sprinkles. My co-worker is getting this filled with Swedish fish, her favorite--and MINE too! What would you want in your jar?