Showing posts with label flowers. Show all posts

Monday, March 24, 2014

Create spring...


Everyone keeps saying "spring is here".  Well, the calendar might say so, but my yard still says "frozen".  I decided I'm going to "let it go" (can you hear me singing?) and make spring things anyways. I'm playing with more goodies from Linnie Blooms and Unique Laser Designs.


I used a watercolor pencil with a wet paintbrush to flick splatters of green color onto these small triangle pennant shapes from Linnie Blooms.


I stamped chevrons (and then flicked more green watercolor) onto this bookmark canvas from Linnie Blooms.  I stapled some random scraps of green ribbon for grass.


I added some alpha stickers to the triangles and hot glued them onto a wire.  I colored these cute wood tulips from Unique Laser Designs with Copic markers and then added some Stickles for fun.


Now, I'm going to go hang this in my window and hope that Mother Nature gets the hint.

~Kelly


Pin It

Friday, September 6, 2013

Be a friend...


I'm continuing my love affair with Linnie Blooms canvas shapes, and this time I am playing with a "long canvas blank".  It is a layer of cotton batting between a blank cotton canvas and a printed cotton layer on the back, size 12"x5".


Just like the other smaller Linnie Blooms shapes that I've played with before, I love the way this texture absorbs any medium I throw at it.  Today---acrylic paint! I used some Scotch blue painters tape and created a chevron pattern.  I did not measure---just laid down the tape in what looked like straight chevrons to my eyes.  I like the way it looked when I aligned them off center.  Make sure you push down hard to adhere the tape to the blank so that you don't get any seepage.


I spread the acrylic paint directly on the canvas with a foam brush using a light gray and canary yellow.  As you can see, there is no need to be neat about it!
I ripped the tape off (I didn't even wait for the paint to dry) to see how it turned out and was so impressed that the lines were so sharp.


To create the jar, I traced a clip art jar shape onto some velum paper and cut it out.  I inked the edges and then highlighted the thread and reflection lines with some Rock Candy Stickles.  I attached the jar to the canvas by sewing on a few stitches (can't have any adhesive showing)!  It's difficult to see in the photo but there are wire stems wrapped with twine that I hot glued to the back of the felt flowers--they run down into the jar so the flowers don't look like they are just free-floating.

Yes, those are Linnie Blooms leaf shapes in between my felt flowers (a Sizzix die).  I swiped some Distress Stain on those leaves to add a splash of color.  Then, I plucked some random buttons from my stash and slid a few seed beads onto the threads as I attached the felt flowers to the canvas. 

Lastly, I printed the sentiment on some cute pink/khaki gingham paper.  I dried the ink with a heat gun to make sure it was really dry before painting a layer of Modge Podge over it to add some texture. 

I loved this project SO much, that I've decided that this was the first in a series of seasonal blanks.  Coming soon---fall!  I better hurry, it's already September!


~Kelly


Pin It


Wednesday, July 31, 2013

Be mixed up...


I'm learning it's ok to be "mixed-up".  At least in the sense of artwork.  I'm finding mixed-media to be very freeing.  No rules, no set structure, no boundaries, just playing.
 
 
Last Friday, I got to play with Linda Barutha at her store, Linnie Blooms (in Mukwonago, WI if you want to visit).  You can find her online store here at http://lindabarutha.com/shop/
She is selling lots of fun canvas shapes that are perfect for so many projects...like these long rectangular "blanks" and the fun sunflower/sun shape.  The possibilities are endless! 

First, I colored the background and flower shapes with Faber-Castell gelatos (and water) and stenciled on more designs with ink. I'm resisting the temptation to buy every gelato in every color!

Then it got even more fun as I continued to add more dimension by placing and squishing the flower shapes into one corner and adding some of Linnie Bloom textures (the cotton netting) that I had inked.  I also used some of that texture to make a little butterfly by folding it into a mini clothespin and adding wire antennae.  Finally, I added some ribbon and twine--twisting and stapling them onto the canvas to create grass, stems, and leaves.  The cute vintage hanger is from Melissa Frances.  For the sentiment, "everything grows better with love"...I  painted Modge Podge onto a piece of grid paper and after it dried I ran it through my printer.  I had to use a heat gun to get the ink to dry (after I learned how wet it stays on my first attempt---oops).


So, are you feeling mixed-up?  It's ok.  Embrace the craziness and create.  That's what I'm going to do.  Creating seems to mask the "crazy" pretty well.

~Kelly


Pin It


Tuesday, July 23, 2013

Be open...


I've been trying to "be" a lot of different things this year on my blog.  And one thing that I wanted when I started this blog was for it to push me, expand me, "open" me.  To new ideas, new people, new techniques, and new projects.  It has done that and I want it to continue.  So, I am expanding into some mixed media projects.  I have decided to try and keep up with this home decor project for each month that I started last month (see July project here). 


Chevron background stamp=CTMH Who's Your Valentine
Bicycle, Sentiment, and Clock=CTMH Enjoy Life
Paper=For Always and Surfs Up
Canvas Flower=Linnie Blooms (http://lindabarutha.com/shop/)
 
 
Lori Brown, a Close to My Heart consultant, sent the Chicagoland Scrapbooker Design Team some papers to play with, and "oh my flowers" did I play! For this project I used papers from "For Always", "Buzz and Bumble", and "Surf''s Up".


Flowers=CTMH Just for You stamped on pages from an old book
August background=CTMH Cherish the Day stamp
Paper=For Always
Canvas Butterfly= Linnie Blooms (www.lindabarutha.com/shop)


You might have noticed those cute canvas shapes (flower and butterflies) that I used too. More focus on those coming soon, but you can check out those and more shapes at Linnie Blooms.
 
Hexagons=CTMH Honeycomb Flair, then cut with Fiskars Hexagon large squeeze punch
Paper=Buzz and Bumble


All this week, you can also see what the other Chicagoland Scrapbooker Design Team members did with all of the CTMH papers.  Check it out at the Chicagoland Scrapbooker blog (there is a CONTEST too).

And, a BIG "thank you" to Lori Brown for letting us play with these beautiful papers. Don't forget to visit her site too, right here.


By the way, just because I am posting an "August" project does not mean I am ready for August.  I'm going to hold onto July real tight for as long as I can.

~Kelly


Pin It


Thursday, March 21, 2013

Be hoppy...

 
Sometimes being "hoppy" takes a lot more effort than it should.  It's been a rough few weeks around here and the snow and cold that are still on the ground (despite the fact that the calendar says that it is the middle of March) are not helping.
 
A little time in the craft dungeon does make me "hoppy".  Doubly "hoppy" in this case.  Fiskateers hosted a mini-crop over the weekend.  I was only able to get 2 challenges done.  The first one, seen above, was a "Kermit" challenge.  In other words, use a frog in your project.  I had to wrap a gift for a wedding shower and had NO wrapping paper besides Christmas.  So, I turned some plain Kraft wrap into something "hoppy".  I used the Fiskars Funky Heart squeeze punch to create the big, dimensional flower. 

 
Since I was digging around in my scrappy stash of goodies and found 2 frogs for Challenge #1, I decided to use the other frog for Challenge #2-Somewhere over the Rainbow.    I used my Fiskars Banner Year XXXL Lever Punch to cut perfect triangles out of these scraps.  Ribbit--little froggy is poking out from behind to wish someone a "hoppy" birthday.

Hope it is warming up where you are and you find some ways to "be hoppy".

~Kelly


Pin It


Monday, September 24, 2012

Whatever is lifted...part 2


Still celebrating another year of "lifting" over at the  Fiskateer site...
for the Lift Off-Lift the Same Name Challenge, I was inspired by the design of this great flower from Kelly #1017 (see her flower here)


 I cut a strip of paper 1 1/2 inches wide and then punched the strip with my Fiskars Threading Water border punch.  I cut a strip at the dip of each scallop to get the "petals" of my flower and then started arranging and gluing them onto a punched 2" circle.


For the center, I cut a circle and placed it in a bottle cap.  I put some Glossy Accents in the center and pressed some beads into the puddle.  I topped everything with more Glossy Accents, and set it aside to dry (for  a    L   O   N  G    time).


This page design comes from a sketch over at Scrapbook Challenges, sketch #309.  This site remains one of my favorites for sketches.  This layout was chosen as a gallery gem for the week of August 24th over on the Scrapbook Challenges blog.


If' I'm posting Halloween layouts, it must be fall!  Who am I kidding, for my regular followers, you know it very well could be February and I would be posting Halloween layouts.  But, it really is fall!  The temps are getting chilly at night, we've even had frost in the garden!  It's my favorite time of year and I'm taking lots of pics to scrap for the future...I'm also trying to get some yard projects done---eek!

~Kelly

Pin It
  

Tuesday, July 24, 2012

whatever is flowered...


You'd think that with only 1 of my 4 children home this week that I'd be getting TONS of scrapping done.  Wrong!  Fiskateers was having an online crop (for those of us sad folks who didn't go to CHA) and I only completed 4 challenges.  But, better than none.  The first challenge done was yesterday's post, the "bushel and a peck" layout of me and my Grammy.  The card above was for the "you spin me round challenge".  I was able to use LOTS of scraps...LOVE, LOVE, LOVE when I can do that.


Next challenge, lift a project from the 7th person on your friend list.  Mine was Amy E., and she had made the most adorable paper wrist corsages.  I thought these would be perfect pony tail holders too...this one has already been swept up by the only child home this week.


Lastly, watercolored background challenge.  Made kind of a blobby mess, but still working on my techniques.  Speaking of watercolors, don't forget that my Graffiti call for Scrapstreet this issue is for cards, layouts, etc. created with watercolors.  You can read the call here

Send in your submissions to editors@scrapstreet.com before August 19th.  Don't you think it is time to see your work published?  I do!

Monday, January 23, 2012

Whatever blooms

Nothing is blooming around here right now. 
Six inches of snow blanket the ground.
We are a long way from spring.  So, I've decided I need to create my own.
This is a very simple (and addicting way) to make some beautiful flowers that you can add to your home, sweaters, scarves, and even cards and pages.

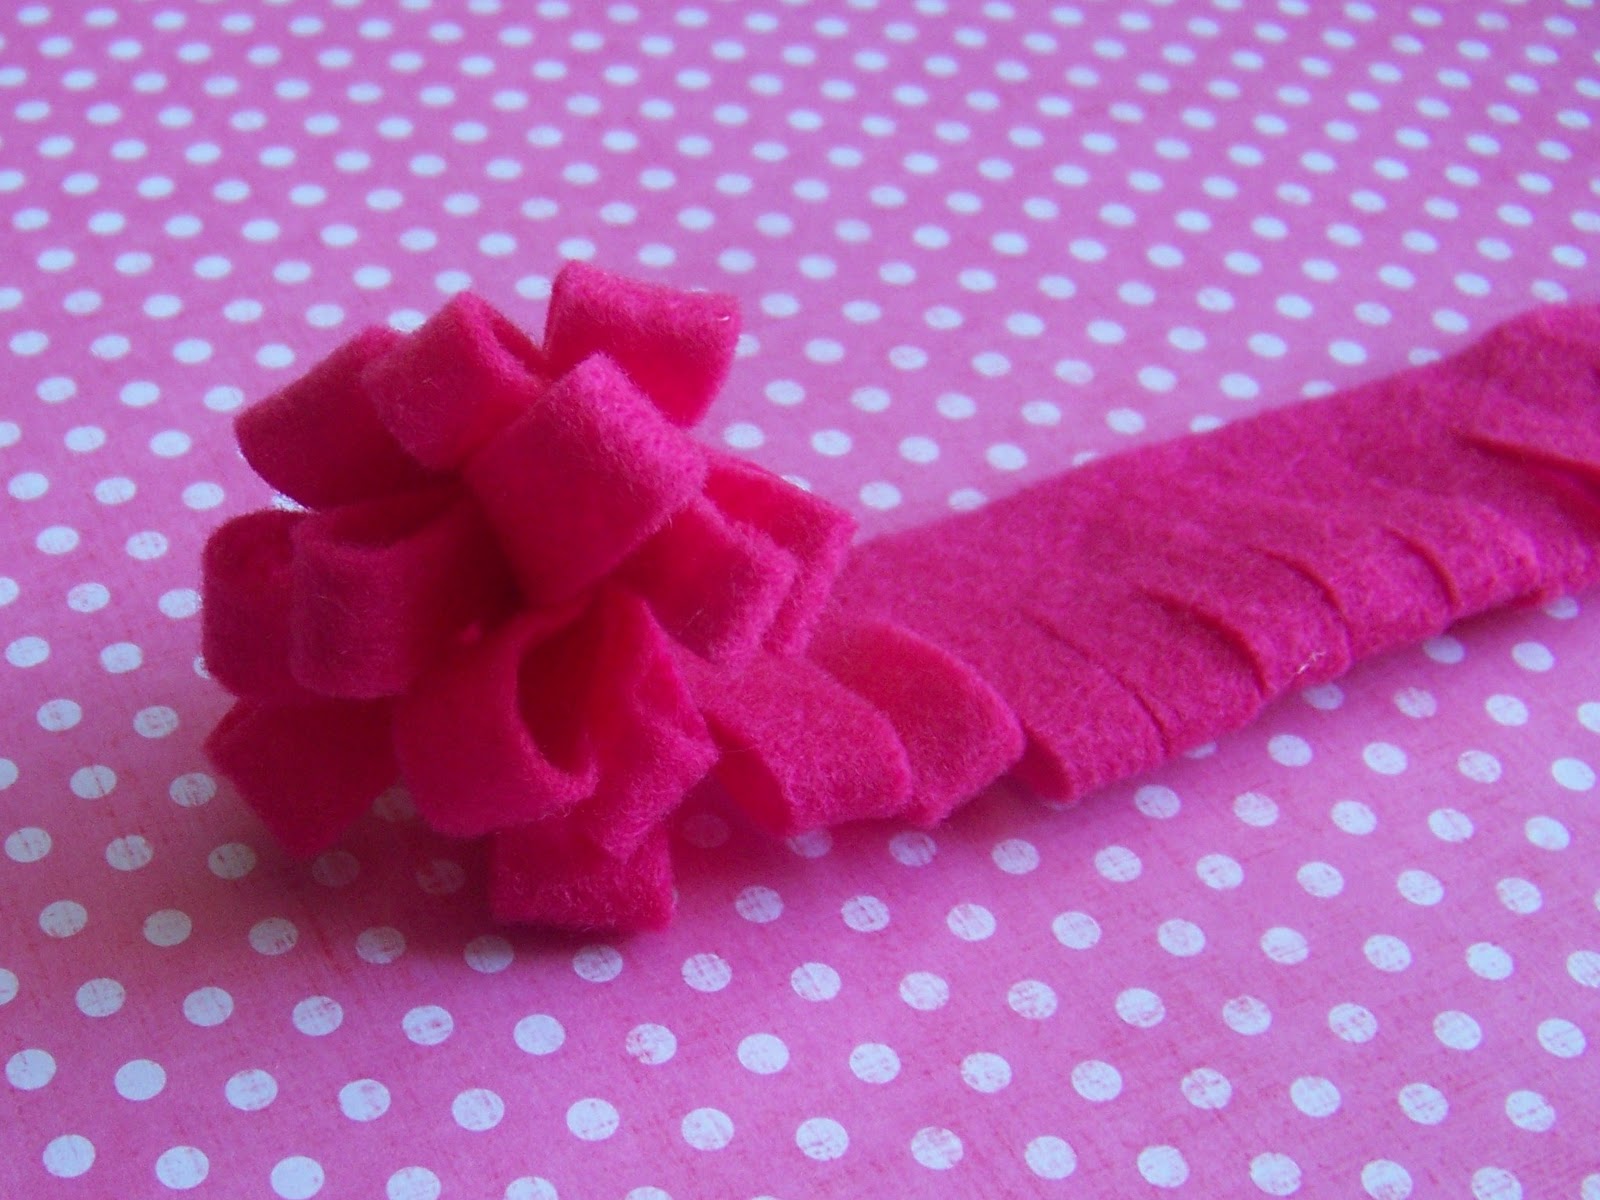
Start with a piece of felt 3 1/2" x 12 " long.  Fold it in half the long way (so it is now 1 3/4" x12"), and hot glue where the two edges meet.


 Then, snip from the folded edge about every 1/2". 

Take one end and start rolling, it helps to add a drop of hot glue every once in awhile to help hold it together.


Boom--you have a bloom!
                                  
Once you've done this a few times, you can really start to play around with how big a piece of felt you use and how far apart or how close you snip--it totally changes the outcome.

You can group some blooms to add to a sweater or scarf.

You can use your bloom on a gift tag
(this one is going on a bottle of wine).


Or, you can create a paper tag to use for a gift card envelope (cleverly recycled flattened toilet paper roll).


Now, I want you to be the florist!  In each issue of Scrapstreet (the FREE online e-magazine, did I mention it is FREE?), my feature article Graffiti, looks at popular art for inspiration.  For the April issue, I'm looking for ONE BIG FLOWER.  Can you guess which famous artist I'll be highlighting?

So, show me your creation with ONE BIG FLOWER!  You can doodle, stamp, cut, fold, paint, or surprise me with your bloom on your card, scrapbook page, or project, but only use ONE flower.  Send your creations to submissions@scrapstreet.com by February 18th.


Check out the other submission calls too... http://scrapstreet.com/ss12/janu12/calls.htm
Turn your mind towards spring!

Wednesday, June 16, 2010

free-flowing, folded box flower, and forever love

Now that school is out, I'm looking forward to getting some more creative time. I've been keeping up with Lift a Fiskateer, and my DT projects for If It's Groovy, but haven't had time to just free-flow. Today was my time.

I took this photo of my great aunt and uncle singing at my grandma's 80th birthday last summer, and I've been wanting to do this LO since my great uncle passed away in January. It's like a "Where's Waldo" of layouts-there is a little bit of everything, lots to look at. The brown leafy stem sticker came from Basic Grey, and so did the doily looking paper. The music sheet paper is from Colorbok, and I used a new EK border punch along the side. I inked a doily and then pressed it onto the paper for a cool pattern.

The paper for the folded "box" flower came from Graphic 45 (this was one of those papers that it was difficult to part with--I REALLY like this pattern). I punched 4 circles, folded them in half, and layered over each other (like the top of a box). Then I repeated with the flowery side up, connected the 2, and layered on 2 buttons in the center. Maybe I'll try making my first tutorial to show you--wow!

At the top of the photo, I inked the flowers and then heated on a few layers of clear embossing powder until they almost "cracked". I then layered them with some felt flowers and leaves. I ran the "doily" paper through the Sizzix texture plate and gave it a checkerboard texture.

This is one of those times where I would LOVE a 12x12 printer. I want to scan this for myself before I put the original LO in a frame for my great aunt--a present to celebrate their "forever love".


Wednesday, April 28, 2010

a First Communion, National Scrapbook Day, and spirelli

Spring means celebrations. It is Luke's First Communion this weekend and he is so excited. Here he is holding the rosary that I made for him.


Saturday is National Scrapbook Day (of course, I will be busy with the First Communion and will have limited scrapping and blog-hopping time that day). Make sure you check out the fun times at Fiskateers and Scrapbook Challenges that start on Friday and extend through the weekend.

Spirelli is Dutch string art. I was watching a PBS episode of Scrapbook Memories and saw a demonstration. So, I thought I would try it for my Scrapbook Challenges flower swap. These are coming to you Larissa!
1)Punch out a scalloped shape from cardstock.

2) Tape one end of some embroidery floss (or metallic thread would be fun too) to the back of the shape.

3) Pull the thread taut and around to the front of the shape, placing it in a "valley" on one side of the shape and then into another "valley" a few down from the last placement. You can place it directly across from the first valley or just skip a few.

4) Keep moving and wrapping in the same direction (I did counter-clockwise...probably a "lefty" thing), always wrapping the one next to the last one you placed. It goes very quickly, so don't feel bad if you get confused the first couple times and need to start over.
5) It can get a little tricky, because each valley is going to get thread placed in it twice.


6)When you are done, tape the embroidery floss on the back and trim off the excess.

These were just my first attempts. I can't wait to make some more and start using them on my layouts and cards.
Now, it's your turn. Try it and let me see your creativity flow! I'll post them here if you send them to me. E-mail it to me at purplekellystar@aol.com

Sorry I missed the Monday recipe post (Jennifer). I'll have 2 on next Monday!