Showing posts with label wreath. Show all posts

Wednesday, October 8, 2014

Create for the door (again)...


With all the wreaths I have made, one would think I live in a house with 1000 doors.  The truth is, I only have 2.  But, I like to re-arrange and update and refresh and change my door decorations a LOT!

This berry wreath has been around my house for awhile, so I though it was time it got a makeover.  I used a large (5") letter "S"  for Starsky and small (1") numbers for our address and an oak leaf (from the 5 piece leaf set) all from Unique Laser Designs. Twinkling H20s are my new favorite watercolor and they added a sparkling shimmer to the oak leaf and to the numbers.


For the "S", I used Distress Stains, creating overlapping stripes along the grain of the wood and then I added some random criss-cross swipes with more Twinkling H20s.

I added that oak leaf with a removable adhesive so I can replace it with different shapes depending on the season.  I'm thinking an ornament for Christmas, a heart for Valentines Day, a bunny for Easter, a flower for spring.  Looks like I have some more creating to do!  Thankfully, Unique Laser Designs has a shape for every need and for every holiday!

~Kelly
Pin It

Friday, September 19, 2014

Create for the door...


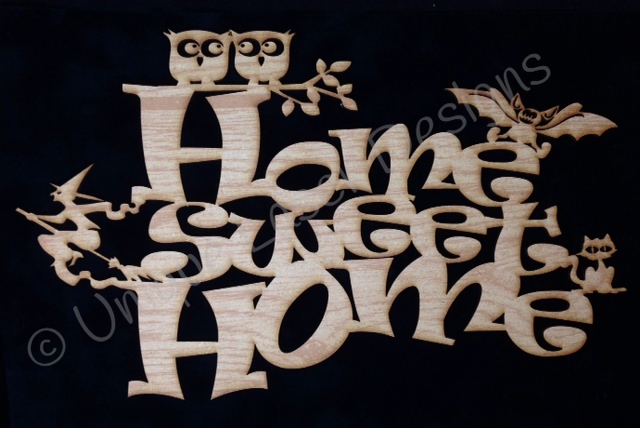
Don't let all of these colorful details scare you away from making this Halloween wreath.  You can make this wreath in about an hour with some yarn, paper rosettes, glue, micro-glitter, and this Halloween wood design from Unique Laser Designs.  First, I wrapped a straw wreath with yarn and then I moved onto the sparkly part of the project.

I covered the whole wood design, "home sweet home", with a piece of scrap paper, but revealed one section at a time.  To that section, I spread on a thin layer of glue and then sprinkled on micro-glitter. Then I moved onto a different section and a different color of glitter.  The flying witch and the bat are purple, the cat and owls are teal, and the "home sweet home" is covered in black micro-glitter (and now so am I).


 I added some paper rosettes and stars and this wreath is ready for the front door!

Halloween decorations don't have to be scary or creepy...
sometimes they can be cute and SPARKLY!

What's on your front door for Halloween?  
Nothing yet?
Why not start with something from Unique Laser Designs...shop HERE!

~Kelly

Pin It

Sunday, August 3, 2014

Create some sunshine...

Trying to hang onto the warmth and the sunshine as we move into August.  Just had to do one more summer project before I give into oak leaves and ghosts.  

Today, I'm using these fun suns and cute flip flops from Unique Laser Designs on a straw wreath that I wrapped with bulky blue variegated yarn.


www.uniquelaserdesigns.com


Last month, Kimberly gave us some great ideas for ways to add color to our wood shapes from Unique Laser Designs (if you missed that post, you can see it HERE).  That got me thinking...how about nail polish?  Shining up these flip flops was my chance since I wanted to color them a bright green and I didn't have the right color in my box of acrylic paints.  Two coats did it--added color and shine all at once.

Then, I used a Copic marker to add the pink around the edge. Lastly I put a heaping ribbon of Tacky Glue on the straps and poured on pink super fine glitter (that took a while to dry).

Onto the suns...

The top sun, I painted with Ranger Distress Crackle in white and then after it dried I rubbed Wild Honey Distress Stain over it---I love, love, love how it turned out.

The swirly sun, I covered in Tacky Glue and then poured super fine yellow gold glitter over.

For the bottom sun, I painted it with a mustard yellow acrylic, then stamped it with Versamark ink using a chevron pattern stamp. Lastly I covered the wet ink with clear embossing powder and heated it up with a heat gun to get that powder to "rise and shine" (sometimes I crack myself up)!


So, I am definitely not ready to say goodbye to summer...we have a whole month of sunny goodness before the "s" word (school) is back in the vocabulary.  What's your August summer project?
~Kelly

Pin It

Wednesday, April 16, 2014

Create in a circle...


I have been on a "wreath kick" lately.  Some of my door decorations have seen better days and I decided that I needed to add something fresh and bright since the calendar says SPRING (I am trying really hard to ignore the snowflakes blowing through the air today).  

I added some ribbon and material scraps to an embroidery hoop (this one is 10 inches in diameter) and it makes a happy home for these decorative bunnies from Unique Laser Designs.  I just added some bright spring colors (sage green, coral, orchid, and periwinkle blue) with acrylic paint and then hot glued them onto the grassy hoop.  A lacey bow finishes it off and my door has gotten a much needed spring makeover.  This project is so quick and easy and you could do this with any of the adorable shapes from Unique Laser Designs (like the bees, butterflies, or birds)--check them out HERE.


Don't forget about the April Challenge on the Unique Laser Designs blog.  You can join in the fun by showing us your creation made with any wood or chipboard embellishment.  You can play along even if you haven't ordered anything from Unique Laser Designs (yet!).


So, does your door need a makeover?  Please share--I'd love to see the "big reveal"!


~Kelly


Pin It

Saturday, March 29, 2014

Create a wish...


My wish...SPRING!
Oh spring, spring...where for art thou spring?

My little spring thing last week really didn't seem to have any effect on Mother Nature, so I'm trying again. This time, I'm making a wreath to grace the door and scare away the winter spirits.


First, I took a straw wreath and wrapped and wrapped it with this pastel variegated yarn.

Next, I took a Linnie Blooms canvas bloom and made a cut in it to the center.  I colored it with gelatos and spritzed with water so I could spread the color with my fingers.  These new spring blooms come in 2 sizes and I colored 5 of each size for this project using all shades of pinks and orange.  Some of the flowers have LOTS of color, some just a bit.  Some are more orange, some are more pink. A flowery hodge-podge!


Once dry, I dripped some  hot glue onto one section next to the slice...


and overlapped the adjacent petal to give the bloom some curved dimension.


Next, it's painting time!  I painted these ADORABLE Easter shapes and letters from Unique Laser Designs.

I "marble-ized" the solid egg and bunny by blending gelatos over the dried acrylic paint and then splattered the letters with pink paint after covering them with a few thin coats of Distress Stain Picket Fence.


I added some seed beads to the center of the blooms and then tucked the blooms in with the wood shapes, a burlap ribbon, and some twisted paper leaves (attaching all of them with hot glue).


This is my ode to spring.  Mother Nature are you listening this time?

I've added this project to the linky yarn party at bugaboominimrme, click here to join in the fun!

~Kelly


Pin It