Showing posts with label ornament. Show all posts

Friday, December 20, 2013

Be decorating...

 
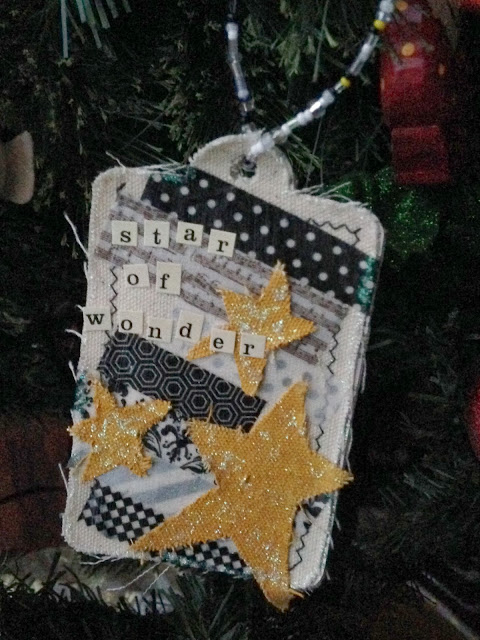
Sometimes tags are just too pretty to put on a gift and then throw away.  Sometimes tags are just too pretty to put on a gift at all.  That is when they end up on the tree as ornaments! 
 
I had every intention of using these Linnie Blooms canvas tags as gift tags, but once I started playing, I just couldn't give them up on a gift, so onto my tree they went!
 
I added strips of washi tape to the tags, and then painted them with a layer of Modge Podge to seal the edges of the tape from lifting.  I painted the tree and stars with acrylic paint and "decorated" with Stickles for extra sparkle.  There can never be too much sparkle at Christmas time!
 
I added some musicality with these alphabet letter stickers from Cosmo Cricket and then strung some seed beads on wire to make them easy to hang.  These are so quick and easy that I will make some more.  Maybe, the next ones I make I'll be willing to part with.  Maybe.
 
 
Wishing you the happiest of times this Christmas season!
Kelly

Tuesday, November 26, 2013

Be wrapped in love...


I do not like to shop.
There, I said it.
I'll say it again.
I do not like to shop.
However, I do like finding the perfect gift for someone. And because I do not shop often, I browse for good gifts all year long. Sometimes, that perfect gift is a gift card (like to their favorite scrapbook store...hint, hint). And, while a gift card may sometimes seem impersonal, when it's wrapped with something hand-made, it seems to be wrapped with love.


The Linnie Blooms shop is full of some new fun holiday shapes, and this stocking is perfect for a stocking stuffer (it doubles as an ornament too).
First, I took out a white crayon and freehand drew some zig-zag shapes on 2 of the Linnie Blooms Canvas Stockings.


With a little bit of Distress Ink and some water, I painted over those zig-zags (one side is Festive Berries and the other side is Evergreen Bough). The white crayon acts as a resist.


Then, I used Tacky Glue to line the edge of one of the stockings and glued them together.


Next came the fun, embellishing part. I glued a thick, furry felt as the top of the stockings and rubbed in some Rock Candy Stickles. I added silver glitter glue as stitches on the toes and heels. I went outside and clipped my spirea shrubs to get some natural sticks that I added to some silver berries and wrapped them in a bundle with some twine. Some Copic-colored Linnie Blooms leaves top it off.


And look...it's the PERFECT size for a gift card!
So don't despair if you don't find that perfect gift...
wrap it in LOVE...then it is perfect!
~Kelly


www.pinterest.com


Thursday, December 22, 2011

Pinecones for the Tree


Even if the gift inside the box is store-bought, having a little home-made topper can make a good present, extra-special. These pinecone ornaments are just perfect for that. I learned to make them ages ago, and decided to add a few new ones to my collection this year.  For the ornament above, I used paper from Bella Blvd.'s new Winter Wonder collection, called Ski Slopes.

To make your own, you will need...
-a small styrofoam egg
-pins
-paper (or ribbon) cut into 1" wide strips, then cut into 1 1/2" long 
 pieces. You will use about six, 1 inch strips.
-ribbon
-tacky glue
Fold the rectangles of paper to a point (not true triangles), as seen in the photo. Place each folded paper onto the egg, pinning at the two top corners. 


The key to getting the pinecone shape started, is to pin 3 of the folded rectangles so their bottom points meet at the bottom of the egg (you can see this in the picture below). Then, you just keep going around pinning the pieces at each corner, covering the pins of the row underneath as you go. 

 Once you get to the top, slide the pins under the fold (see below).
 
Loop some ribbon on a pin (I used a pearl-topped headpin for this), making your first loop a big one so you can use it for hanging on the tree.  Dip the pin in some tacky glue before sticking it into the top of the pinecone.


Here are a few I made with ribbon. They are hanging on the tree, just ready and waiting if I need to attach them to the top of a package.


I hope you have all of your shopping done and can take some time to sit back and relish in some holiday memories as they happen.  Make sure you get some photos too!

Merry Christmas and Happy New Year!