Friday, December 27, 2013

Be ready to celebrate...

 I was playing with the  Linnie Blooms canvas flowers this week, and I had an idea to make a poinsettia, but the week got away from me and now it is 2 days past Christmas, so I decided the red poinsettia in my mind would become a winter poinsettia instead.

I started with the Linnie Blooms canvas sunflower, and snipped away every other petal. I used five Linnie Blooms canvas leaves added in as more petals. To color these, I started by rubbing with white and sky blue vivid oil pastels (I was very random and didn't color the whole petal) and then went over it with Distress Stain Faded Jeans. I outlined in Stickles and added some pearls for the center.
At some point, in the middle of my creation, I decided this would be a great tag for this New Years Eve. Thinking about New Years Eve made me think of confetti and so I quickly punched out some big dots, added a glittery 2014, and I am already to dress up a bottle of wine.
Wishing you and your family
a very happy, healthy New Year...
one that tops 2013!

~Kelly

www.pinterest.com

Friday, December 20, 2013

Be decorating...

 
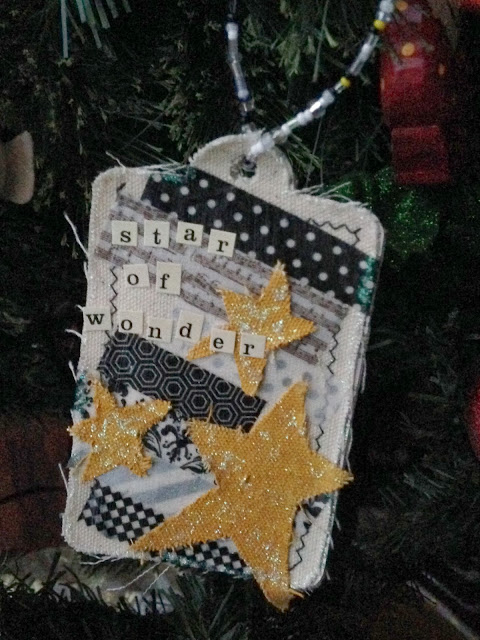
Sometimes tags are just too pretty to put on a gift and then throw away.  Sometimes tags are just too pretty to put on a gift at all.  That is when they end up on the tree as ornaments! 
 
I had every intention of using these Linnie Blooms canvas tags as gift tags, but once I started playing, I just couldn't give them up on a gift, so onto my tree they went!
 
I added strips of washi tape to the tags, and then painted them with a layer of Modge Podge to seal the edges of the tape from lifting.  I painted the tree and stars with acrylic paint and "decorated" with Stickles for extra sparkle.  There can never be too much sparkle at Christmas time!
 
I added some musicality with these alphabet letter stickers from Cosmo Cricket and then strung some seed beads on wire to make them easy to hang.  These are so quick and easy that I will make some more.  Maybe, the next ones I make I'll be willing to part with.  Maybe.
 
 
Wishing you the happiest of times this Christmas season!
Kelly

Monday, December 2, 2013

Be warm...


Baby, it IS cold outside. Time to dig out those mittens...inside and out! We are all playing with the Linnie Blooms canvas mitten shapes this week and they are just screaming for fun embellishments!
As I mentioned in a previous post, I really do not like shopping. Gift wrapping is where my heart lies. The present inside may not be that great, or it may be a gift card, but a pretty topper makes it special.
For these tags (that I cut into 3 1/2"x 6" from old file folders), I painted the canvas mittens with acrylics and added dashes of Picket Fence Distress Stain, outlined in Rock Candy Stickles. I put a layer of Aleene's Tacky Glue at the top and pressed in tiny clear white seed beads to make the cuff. Into my bin of doo-dads, I found and added some felt snowflakes, metal snowflake brads, wood snowflakes (painted and Stickled), and pearls. I love that these canvas shapes can hold up to anything added to them (they are quite heavy when you start adding paint and beads and Stickles--regular paper couldn't hold up to this kind of "beading"...hee hee).
You can see how the Distress Stain tames the pattern of the paper at the top (I stained the paper, then ran it through the printer when it was dry). 
 
 
I often add sayings and phrases inspired by song lyrics to my projects, and here I am doing it again! I liked this dotty paper, but found it just a bit too bold for what I needed. By adding a few layers of Picket Fence Distress Stain (and drying it with a heat gun between layers), I was able to tame the background and make it ready for running through the printer.

So, while I continue to "pro-craftinate"...that is avoid putting up Christmas decorations (or maybe it is because we are remodeling our bathroom and I have a bathtub, toilet, double vanity, linen cabinet, etc. in my living room and there is no room for the tree)...I am reminded that I am wrapping these gifts in LOVE.
After all, shouldn't the whole season be wrapped in LOVE?

~Kelly
www.pinterest.com
 
Don't forget...when you are shopping at the Linnie Blooms online store, that you can use the discount code LB2013KS to get 10% off your order!


Tuesday, November 26, 2013

Be wrapped in love...


I do not like to shop.
There, I said it.
I'll say it again.
I do not like to shop.
However, I do like finding the perfect gift for someone. And because I do not shop often, I browse for good gifts all year long. Sometimes, that perfect gift is a gift card (like to their favorite scrapbook store...hint, hint). And, while a gift card may sometimes seem impersonal, when it's wrapped with something hand-made, it seems to be wrapped with love.


The Linnie Blooms shop is full of some new fun holiday shapes, and this stocking is perfect for a stocking stuffer (it doubles as an ornament too).
First, I took out a white crayon and freehand drew some zig-zag shapes on 2 of the Linnie Blooms Canvas Stockings.


With a little bit of Distress Ink and some water, I painted over those zig-zags (one side is Festive Berries and the other side is Evergreen Bough). The white crayon acts as a resist.


Then, I used Tacky Glue to line the edge of one of the stockings and glued them together.


Next came the fun, embellishing part. I glued a thick, furry felt as the top of the stockings and rubbed in some Rock Candy Stickles. I added silver glitter glue as stitches on the toes and heels. I went outside and clipped my spirea shrubs to get some natural sticks that I added to some silver berries and wrapped them in a bundle with some twine. Some Copic-colored Linnie Blooms leaves top it off.


And look...it's the PERFECT size for a gift card!
So don't despair if you don't find that perfect gift...
wrap it in LOVE...then it is perfect!
~Kelly


www.pinterest.com


Saturday, November 16, 2013

Be secretive...


Let's play
"what's in my Linnie Blooms canvas flourish pocket"...
You can't probably guess from this first picture, but maybe this next one will give you a hint.


Did you guess secret journaling? Ding-Ding-Ding...you are right!
Earlier this month, on my blog, I discussed my new adventure into an art journal...you can check it out here. I have never done anything like this before, and I must admit, it is quite addicting (like I need another crafty addiction!).


The Linnie Blooms "mixed stitch canvas book" is what drew me in. I saw one in the "real" Linnie Blooms store when I was there this summer and I knew it was something I wanted to try. You can see it on the online store here.


So, I am creating an art journal inspired by songs I love. This page happens to be a "church song", but believe, me I will be covering all sorts of music by the time this book is done. This song, "You are Mine" has a very special place in my heart because it came to me during a very difficult time. The story is one that I don't want to share with everyone, so this Linnie Blooms canvas flourish pocket is a perfect "secret keeper".
To create the pages, I covered them sloppily, or should I say "creatively" in white and then metallic gold acrylic paint. I added some gold glitter gel, a pearl embellishment, some doilies die cuts (Sizzix decorative doily), lace, patterned paper, and fabric scraps. I attached and covered all of these additions with Mod Podge.
 
 
For the pocket, I used a stencil from Crafter's Workshop, and then spritzed my own mixture of gold metallic acrylic paint, Create a Shade Pearl Paint from Close to My Heart, and water to get the design. The color is subtle, but still has enough contrast to really stand out. I used Fireline, (which is really thin beading wire), to string on a few seed beads (clear, silver, and irridescent white) to embellish and create a border around the pocket. The pocket is attached to the journaling page with a delicate pearl pin from Maya Road.

So, what are you going to put in your secret pocket?


~Kelly


Pin It

**Remember...just for my beloved followers, I have a SUPER discount code for you. If you want to place an order at Linnie Blooms online store, you can shop here... http://lindabarutha.com/shop/. Use the code LB2013KS and you will get 10% off your order. Enjoy!


Wednesday, November 6, 2013

Be seasonal...

It's time to stop and smell the leaves.
It's also time to stop and shovel the leaves.  So many have fallen in the last few days, that I can't even see my driveway.  I'm not complaining, because I would much rather shovel leaves than snow.  That white stuff will be here soon enough.

Today, I'm bringing the leaves indoors too.  I'm adding another season to my Four Seasons project with the Linnie Blooms canvas long blanks.  Linda has been adding new shapes, and these Linnie Blooms leaves absorbed the color from Distress Inks and Distress Stains so vividly.  I stamped a subtle swirl pattern on top too. I used hot glue to attach my leaves to the wire stem and canvas long blank so that I could "sculpt" some shape into the leaves.  Using a hot glue allowed me to push, raise, and wrinkle the leaves to give them even more texture and dimension. 

With mason jars a hot trend right now, I traced one onto vellum paper from clip art I found online.  Once again, I painted a chevron background by taping off the pattern with Scotch blue painter's tape (my new love).  There is also some twine and wire in there too. 
I didn't want to overwhelm this canvas...sometimes it's hard for me to tell myself to "STOP ADDING MORE ITEMS".  But, I'm happy where I stopped with this one. 


Autumn is a second spring,
and I am taking time to recognize each leaf as a flower.
~Kelly


Pin It

**Remember...just for my beloved followers, I have a SUPER discount code for you. If you want to place an order at Linnie Blooms online store, you can shop here... http://lindabarutha.com/shop/. Use the code LB2013KS and you will get 10% off your order. Enjoy!
 

Tuesday, November 5, 2013

Be daring...

This whole "mixed media" art is still very new to me. Sometimes it is difficult for me to move out of my comfort zone. What am I? A scrapbooker? A paper artist? An artist? I feel like I'm neglecting my scrapbooking if I start dabbling in other media. I feel like I'm "cheating" on my scrapbooks if I play with something else.


I really, really need to get over it...
it's not like my supplies have feelings!

When I have been at the Linnie Blooms store, I have drooled over Linda's "mixed stitch journals". So I finally bought one. And, I dove in. When I should have been paying attention in church the other day, God had another plan for me. He led me to find a theme for my journal. This is just the cover, but slowly it will develop into a big fat work of art highlighting some of my favorite songs and lyrics. Now, I wasn't really zoning out in church, because it was one of my favorite church songs that led me to this project. I think it will be the next page, so I'm not going to go into a full reveal just yet.
For now, you get the cover... "songs in my heart". I inked the cover with Distress Inks and Stains and water, using some stencils in spots. I used paint markers to make a frame around the edge of alternating black and white rectangles--sometimes I think every piece of art should have a black and white checked frame. I will try to resist from including it on every page of this journal, but I won't make any promises. I stamped a sheet music background stamp with Stazon ink and random stamped in every direction. The canvas hearts are also from Linnie Blooms...the pink one is colored with Copic markers and the smaller one is covered in washi tape. I placed and replaced 100 different ribbon and lace scraps before settling on the ones pictured...I was so PICKY! Lastly, I added the title. I cut the words with my Silhouette Cameo (LOVE it) and hand wrote "in my" with Stickles.

Oh, and I mentioned "stencils"...that's because the Scrap It Girl November challenge is STENCILS...check it out HERE and join in the fun this month.


This journal is just the beginning of a new journey. I need to focus on what makes me happy and not worry about my supplies "feelings". I do this for me. It's what I need right now. There are no mistakes. Just possibilities.


~Kelly


Pin It

**Just for my beloved followers, I have a SUPER discount code for you. If you want to place an order at Linnie Blooms online store, you can shop here... http://lindabarutha.com/shop/. Use the code LB2013KS and you will get 10% off your order. Enjoy!

Friday, October 25, 2013

Be thankful...


Sometimes, a simple "thank you" isn't enough. 
Sometimes, a paper "thank you" isn't enough. 
Sometimes, any  kind of "thank you" isn't enough, but something will have to do.
This is one of those times.


I'm playing with Linnie Blooms shapes again, and this time it is the new canvas pocket (available soon).  It's the perfect size for a gift card or...


a pull-out message.

I stamped the pocket with Distress Inks (I love that they don't bleed on the canvas) and then added some Distress Stain color on the flap along with some washi tape and some buttons.  Inside, I used more Linnie Blooms shapes (pockets, pennants, and hearts) to make a mini banner.  I used acrylic paint, Copic markers, and more Distress Stains along with more washi tape to complete the banner.

Wondering how I got those letters on there?  I laid down some alpha stickers and painted right over them.  When the paint was dry, I lifted the stickers off and a perfect stencil remained (no seepage). 


It may be small on size but it represents a BIG, heart-felt thank you for a dear friend (hope she's not reading this before I send it to her).


And, it's the gift that keeps on giving because it can be passed on and on and on to new recipients.
 
Spread the love.
 
~Kelly


Pin It


Friday, October 18, 2013

Be kitchen inspired...

 Sometimes, when I am feeling un-inspired, and I am tired of  "pinteresting", or"blog hopping", or "googling",  I just try to scope out what is around me.  That's what the Scrap it Girl Design Team is doing this month as we scope out our own kitchens for color. 

My kitchen is "apple inspired" and Red Delicious Red and Granny Smith Green are my colors (along with black and white).

Just used some scraps, Fiskars hexagon punches, ribbon, and some white acrylic paint to whip up some birthday cards.  Now, it's time to go "whip up" something for dinner. 

Play along with the October Challenge at Scrap It Girl (I am the  hostess, so there is a great prize pack for the winner)---create anything using colors inspired by your kitchen.  Come see what the DT is "cooking"!


~Kelly


Pin It

Thursday, October 3, 2013

Be seasonal...


It is October!  I seem to have a minor "freak out" with each month that passes.  How can another month go by so quickly!  October is a month to cherish though.  It is nature at its best and brightest.  So, why not replicate it?  I'm playing with Linnie Blooms canvas shapes again, and this tree is a new one in the store.  I was at the "real" Linnie Blooms store last weekend and got a chance to experiment a bit.  Both Linda and I loved the look of stamping chevrons on the canvas shapes, so I decided to ink chevrons to the trunk while loading up the tree with colorful buttons.

Have you been keeping up with all of the new shapes that Linda has added to the Linnie Blooms online store?  Owls, leaves, and trees are perfect for your fall projects while the circles, stars, and hearts are perfect for anytime!  What is your WIP (work in progress)?
 
My WIP is trying to find some time to enjoy the natural colorful wonders right outside my window.
 
What a wonderful world indeed!

~Kelly
Pin It

Friday, September 20, 2013

Be a story-teller (part 1)...

This is the story of a WIP (work in progress).  The Scrap It Girl Design Team is having a mid-month challenge!  The challenge is to use wood in your project.  So, I received this fabulous wood book (that I failed to take a "before" picture of, but you can see it here at the Genuinely Jane Studios site).  I used the wood book as a stencil to trace onto paper and then used the paper to cover the book.  Chipboard letters covered with acrylic paint and Stickles are the "WOOF".  And because I just happened to have some doggy ribbon (doesn't everyone?), I tied some on to the rings.  No peaks inside yet, because, remember, I said it is a WIP.  I'm going to fill it with pics and stories about the dogs that have and still do grace our family.

More coming soon!

~Kelly

Pin It

Thursday, September 19, 2013

Be ready to soar...

Soaring is not on my "to do" list lately.  More like "squeeze in some crafty time when I can".  However, this ink-speckled bird is ready to fly!  When I was shopping at Linnie Blooms in July, my items were given to me in a plain Kraft gift bag.  I told Linda Barutha (Linnie Blooms owner) that the bag would come back to her eventually.  I kept my promise and went wild!  I zentangled with a fine point Sharpie on a square blank and then added Distress Inks to this bird and its wing (which also doubles as a leaf shape).  Sharpies, Distress Inks...is there anything these Linnie Blooms shapes can't withstand?

And why stop there?  I crinkle folded some border punch cut strips and attached them onto the bottom of the bag.  I also spy a paper doily, a butterfly and flower (both punched from an old book), a little spritzing, and don't forget the burlap scrap!

How about you?  Ready to soar or just squeezing in some crafty time when you can?  Hope it's the first one!

~Kelly

Pin It

Friday, September 6, 2013

Be a friend...


I'm continuing my love affair with Linnie Blooms canvas shapes, and this time I am playing with a "long canvas blank".  It is a layer of cotton batting between a blank cotton canvas and a printed cotton layer on the back, size 12"x5".


Just like the other smaller Linnie Blooms shapes that I've played with before, I love the way this texture absorbs any medium I throw at it.  Today---acrylic paint! I used some Scotch blue painters tape and created a chevron pattern.  I did not measure---just laid down the tape in what looked like straight chevrons to my eyes.  I like the way it looked when I aligned them off center.  Make sure you push down hard to adhere the tape to the blank so that you don't get any seepage.


I spread the acrylic paint directly on the canvas with a foam brush using a light gray and canary yellow.  As you can see, there is no need to be neat about it!
I ripped the tape off (I didn't even wait for the paint to dry) to see how it turned out and was so impressed that the lines were so sharp.


To create the jar, I traced a clip art jar shape onto some velum paper and cut it out.  I inked the edges and then highlighted the thread and reflection lines with some Rock Candy Stickles.  I attached the jar to the canvas by sewing on a few stitches (can't have any adhesive showing)!  It's difficult to see in the photo but there are wire stems wrapped with twine that I hot glued to the back of the felt flowers--they run down into the jar so the flowers don't look like they are just free-floating.

Yes, those are Linnie Blooms leaf shapes in between my felt flowers (a Sizzix die).  I swiped some Distress Stain on those leaves to add a splash of color.  Then, I plucked some random buttons from my stash and slid a few seed beads onto the threads as I attached the felt flowers to the canvas. 

Lastly, I printed the sentiment on some cute pink/khaki gingham paper.  I dried the ink with a heat gun to make sure it was really dry before painting a layer of Modge Podge over it to add some texture. 

I loved this project SO much, that I've decided that this was the first in a series of seasonal blanks.  Coming soon---fall!  I better hurry, it's already September!


~Kelly


Pin It