Sunday, October 24, 2010

Got gum? I have Halloween gum wrappers!


I have a love for monsters. Not only the 4 I have at home (just kidding--I love you kids), but silly, goonie-looking not so scary monsters. They've shown up here on these gum wrapper treats. I cut these monsters out of some creep-a-licious paper from Reminisce. Trick or Treat? Definitely a treat!

Monday, October 18, 2010

Pink and Orange DO go together


As a special October Breast Cancer Awareness Month challenge, Tami, one of the leads at Fiskateers, had a few of us working on a secret project...create something highlighting the colors Pink and Orange. I threw a little Halloween fun in too, and I created a bracelet and earrings by stamping and coloring on Shrink Plastic (like Shrinky Dinks). And let me tell you, it sure is fun to shrink the plastic with a heat gun...then I don't have to press my nose so close to the oven door to watch it shrivel (hee-hee).

Here is a little photo tutorial on my creations.


-I cut sheets of shrink plastic (like Shrinky Dinks) into approximately 1 1/2" x 1 1/2" squares and 1 1/2" x 2" rectangles using my Fiskars bypass trimmer (the one with a guillotine-like blade).
-Using black Stazon ink, I stamped some Halloween images onto the "rough" side of the plastic sheets. I found it very difficult and slippery to try and stamp on the shiny side. Note that due to the texture of the plastic sheet, the images did bleed a bit. So, it would best to choose images that are simple and have less detail.
-Once the ink dried, I colored them with colored pencils (again, on the "rough" side).
-Using the piercing tool from my Fiskars Tool Taxi, I held down each shape as I shrunk it with my heat embossing gun (remember to do this on a heat resistant surface).
-Once they were shrunk and cooled, I used my Fiskars Craft Drill to drill a hole in each piece.
-2 important SIDENOTES: Make sure you put a piece of wood under your project while you are drilling. And, I did try punching a hole in the plastic before shrinking... But, since the hole shrinks too, I was having difficulty with the control I had over the size and placement and decided to use the drill instead.
-I added some jump rings (note to self: buy some bigger jump rings) and beads to some flex-wire and head pins and oooh-laa-laa, I have some fun and funky jewelry for October!
Now, you MUST check out the fabulous VIDEO that Tami put together to highlight all of the pink and orange projects. I'm proud to be a Fiskateer!

Saturday, October 16, 2010

NOT Lost in Translation


Over on the If It's Groovy blog, we were given a challenge to translate a phrase and create a layout with it. Here is my project...


Nothing fancy, because this time it is all about the precious picture of my daughter and our dog, Basso. Just using up some scraps of dog-themed paper and stickers on this irridescent pink patterned paper, some paper crimping, a title, and I'm done. I am a font fiend, and I love searching sites for free font downloads. I also have to give kudos to this website that I used to convert my title, www.freetranslation.com. I do not speak any foreign languages, but I can conjugate Latin verbs and decipher vocabulary (how useful is that?). My highschool Latin teacher would be so proud...semper ubi sub ubi (always wear underwear).

Monday, October 11, 2010

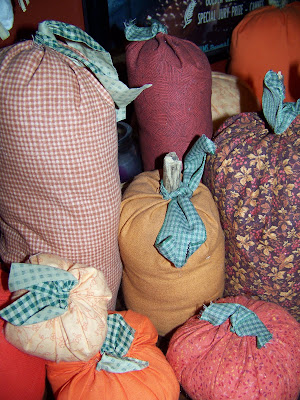
Pick-a Pick-a Pumpkin from the pile...and a "banner" Halloween


I made these pumpkins about 5 years ago, and even though they get squished into a plastic bin for storage after Halloween every year, they've held up very well. Except a few have gotten their "stem" pulled out by a Golden Retriever I know that likes to chew on sticks (we should have named him "Chip").

They are "sew" easy...I thought I would share them with you.

I start by using a bowl or template to draw a circle on some material, and then cut out the circle (I like to use pinking shears to avoid the un-ravelling edge).


I take a needle and thread and do a quick running stitch (in, out, in,out) all of the way around the edge. No need to be perfect here...no one will see your stitches.

I add a little "filling", pull the thread, add a stick for a stem, and tie it up.

I add some ribbon scraps for leaves/vines. After I've made a few pumpkins, in all different patterns, I take 3 or 4 and hot glue them together.

I've made my own pumpkin patch for a fall display in the family room and around the flower centerpiece on the dining room table. Let me see your pumpkin patch!

Fall is in the air, literally, in the air, hanging between rooms...I made this 2-sided Halloween banner for a challenge over in Fiskateerland a few weeks ago. I hung it up and was happy, but it just needed something more. I decided to tie on some scraps of fabric cut into strips, and now it is complete!