Thursday, December 30, 2010

How do you measure a year?

365 days... 8,760 hours...525,600 minutes...31,536,000 seconds...(don't check my math).
I've been blessed with another year. A year of joys, tears, successes, fears, love.
2010 is the year I started this blog. And, while I may not have "chatted" as much as I would have liked, I am thankful to have this outlet. Even if no one is listening or reading or looking. It's mine.
In the last 24 hours, I've made a list.
11 goals for 2011.
I still have about 24 hours to change and re-arrange...
-----------------------------------------------
#1-Make time and take time to read.
#2-Finish our family Christmas photo mini-book. Book is made--it has no photos in it.
#3-Start a recipe scrapbook. Family favorites all in one place.
#4-Be ok with saying "no" to requests
#5-MOVE some everyday...even if it is 5 minutes. Preferably 15 minutes.
#6-Push, explore, and share my scrapping abilities. DT? I'm aiming for a secret something that I'm not willing to share yet.
#7-Initiate photo re-organization using Stacy Julian's Library of Memories method. Be ok with however far I get.
#8-Spend more time with girlfriends.
#9-Prayer and reflection everyday (and not in desperation)
#10- Dedication to a picture a day with...
#11- LOVING...my "one little word" for the year. Inspired by Ali Edwards project...read here for more details... http://aliedwards.com/2007/01/one-little-word-3.html . At the end of the year, I want to make a book with those 365 photos all reflecting on this one little word...LOVING
I'll focus on what I am LOVING each day. Finding something LOVING in each day. Recognizing LOVING that is happening in each day. What's your one little word?
These are my last layouts (from Fiskateers Liftateers) of 2010.

I am LOVING these.
Happy New Year~may it be a special one.

Monday, December 20, 2010

Where to put those gift cards....hmmm


I had some neighborhood friends over last night for a "wrap" party, and I taught all of them how to make these great gift card holders. They were all skeptical when I told them to bring over empty toilet paper rolls! But, we flattened the rolls, glued on papers and punches and embellishments and they were impressed with their own creativity!


To make these...
-flatten your paper roll
-cut the paper about 3/4 inch wider than your roll so you can fold the paper over one end. I found hot glue works the best for adhering this first layer of paper onto the cardboard roll.
-Cut the length just enough to wrap and overlap.
-Decorate, decorate, decorate.
-Then, make a small hole on the open end (all the way through both layers).
-Slide your gift card in and then place a brad in the hole to close it up.


Your relatives will be so impressed!

Sunday, December 12, 2010

The 12th day of Christmas--2 more tags for me


My version of Tim's tag #9
I added a little color to the tag by using a burgundy paper for the rosette and for the matte under the phrase.


My version of Tim's tag #5

I used some snowflake patterned, glittered paper as the base and punched the holly leaves with some glittered paper (saved me some steps). I used a small square of some vintage-looking paper I had since I couldn't find a big Santa face like he had. Lastly, I used some Thickers for the "25" since I just wanted to simplify.


The 12 days of Christmas have come and gone, and I'm going to need at least 12 more days to get a few more of Tim Holtz' tags done. I've watched him through photos and videos teach techniques for embossing, stamp-making, masking, inking, crackling, and the list goes on. Let's just say I've added a few of his products to my Christmas list.

Monday, December 6, 2010

Tim's Tag #6, Kelly's Tag #1


12 days of Christmas, 12 days of tags over at Tim Holtz's blog. This guy has more creative juice in his little finger than I can only wish for. It is a challenge to find "substitutions" for his elements. He loads each tag with lots of new techniques. There are so many layers and steps, that each tag becomes a work of art. There is a lot of time that went into this one. Maybe the next one will go on a present...this one, is for ME.

Friday, December 3, 2010

Not a Christmas project, but still a project (or 3)


I recently followed a few sketches over at Allison Davis' blog for Scrapbook Generations new sketch site and publishing creative DT. While I didn't make the DT, it did allow me to get some pages done. Next on my "to do" list, getting 4 kids to sit still and look good for a Christmas photo. Wish me luck!

Wednesday, December 1, 2010

December is HERE! Project #1


I'm going to try really hard. I mean REALLY hard to post 12 projects before Christmas. Christmas projects to help you find the energy and blessings of Advent.


Day 1: Last year, I made an Advent calendar tree. I bought these little wood boxes from Oriental Trading Company. After many hours of sanding to get all of the doors to fit, I painted them, and then distressed them with sand paper. I created a structure that will allow all of the doors to slide open so the kids can pull out the slip of paper with the Advent activity for the day and the chocolate. Then, I pulled out my stash of stickers, ribbon, brads, and Christmas goodies to decorate each box. It's already become a favorite tradition.

Friday, November 19, 2010

If It's Groovy--my DT swan song

I have had a blast being part of the If It's Groovy DT. It was my first DT and will always have a special place in my crafty heart. I've decided to take a break from the DT and focus on my home and some self-paced projects. This is a project I did called "Inspired Every Day-by the Everyday". I'm hoping to make this a regular series for my blog, so here is hoping that this is the first of many "everyday inspirations".

Inspired Every Day
There have been times where my desk has become a pile of “s-crap”. For months. Yes, months. Sure, I can go to the internet or look through my pages of ideas that I’ve ripped out of magazines, but what has helped me re-fuel is to look at the “everyday”. After all, isn’t that why we scrapbook? Save some time, save your money. Look around you. What can you find to inspire you? A cereal box? A bible verse? A pair of shoes? A shower curtain?

While we may have wonderful memories from vacations, weddings, and graduations, “everyday” is where we spend most of our time. And, sometimes it’s not enough to see those memories in scrapbook form. We need to let our creative juices pour out into other things…our jewelry, paintings, walls, gardens, furniture. After all, we are not just scrapbookers. We are artists.

This is the first in a series of articles to get you inspired every day, by the everyday. And I’m hoping to inspire you to make your creative juices pour out.

My first source of inspiration? My bathroom tile. I hate it. Wait, HATE is such a strong word. I really, really, really, really do not like my bathroom tile. I look at it and it screams 1966! It’s cream colored with light brown flecks (which look like freckles) and every so often there is unique tile that really screams 1966! It looks like… gear shaped snowflakes?! And while I really, really, really, really do not like it in my bathroom, I’ve used it as a source of inspiration for a scrapbook page.

Here is a picture of my tile (I told you, 1966!!!)


Here is the page that it inspired. Headline: Ugly tile inspires A Whole New World. I cut square cardstock “tiles” and fleck painted them by putting brown paint on an old toothbrush and rubbing it against a piece of plastic. After they were dry, I ran the squares through a Cuttlebug embossing folder (Swiss dots). I used Spellbinder nesting dies and Sizzix snowflake dies and assorted punches to re-create that “unique” tile design.

Right now, go look at your bathroom tile. Go. Right now, I’ll wait…Hopefully, yours is newer than 1966. But ugly or not, let it inspire your next scrapbook page. And, come back and show us your tile inspired art.

Be inspired every day, by the everyday.


Wednesday, November 17, 2010

A purpose under heaven (and in heaven too)

Every dog has a purpose. Indy's was to teach, love, and lick... not necessarily in that order. I just finished reading "A Dog's Purpose" by W. Bruce Cameron. As I read, I reflected on the passing of our first "baby". She taught us a lot and gave us the practice we needed to have 4 kids. We will always love you Indy!
INDY January 11, 1996-October 27,2010

She also taught us to perservere. And it is in that mind-set, that we couldn't be a 1 dog household for very long. We welcome with love...Axel
He is a "mutt" with some obvious shepherd and lab traits. He has brought joy to our house as our new fur-baby.

Did you know, in addition to everything else they eat, puppies eat into "scrap time"? It's been tough to get anything done around here, especially Christmas cards! But, I've gotten a few layouts done to share.

I used this precious photo for a "Liftateer" layout over at Fiskateers.

This layout was inspired by Gerry van Gent's "Just a Boy" LO from August over at Scrapbook Challenges. I loved all of the stitching she did around her page so I used it too!


This is from Sketch 224 at Scrapbook Challenges.


This one is a Kelly "original". I tried a new technique for me on the right page...back-stitching with ribbon. I like the effect.

And, if this one look familiar, it's because I already posted it back in October. But, this week it is a "gallery gem" over at Scrapbook Challenges. Thanks to Ana for choosing my layout to showcase!

I'll be back soon with a paper-piecing technique and my Christmas cards (I hope).


Sunday, October 24, 2010

Got gum? I have Halloween gum wrappers!


I have a love for monsters. Not only the 4 I have at home (just kidding--I love you kids), but silly, goonie-looking not so scary monsters. They've shown up here on these gum wrapper treats. I cut these monsters out of some creep-a-licious paper from Reminisce. Trick or Treat? Definitely a treat!

Monday, October 18, 2010

Pink and Orange DO go together


As a special October Breast Cancer Awareness Month challenge, Tami, one of the leads at Fiskateers, had a few of us working on a secret project...create something highlighting the colors Pink and Orange. I threw a little Halloween fun in too, and I created a bracelet and earrings by stamping and coloring on Shrink Plastic (like Shrinky Dinks). And let me tell you, it sure is fun to shrink the plastic with a heat gun...then I don't have to press my nose so close to the oven door to watch it shrivel (hee-hee).

Here is a little photo tutorial on my creations.


-I cut sheets of shrink plastic (like Shrinky Dinks) into approximately 1 1/2" x 1 1/2" squares and 1 1/2" x 2" rectangles using my Fiskars bypass trimmer (the one with a guillotine-like blade).
-Using black Stazon ink, I stamped some Halloween images onto the "rough" side of the plastic sheets. I found it very difficult and slippery to try and stamp on the shiny side. Note that due to the texture of the plastic sheet, the images did bleed a bit. So, it would best to choose images that are simple and have less detail.
-Once the ink dried, I colored them with colored pencils (again, on the "rough" side).
-Using the piercing tool from my Fiskars Tool Taxi, I held down each shape as I shrunk it with my heat embossing gun (remember to do this on a heat resistant surface).
-Once they were shrunk and cooled, I used my Fiskars Craft Drill to drill a hole in each piece.
-2 important SIDENOTES: Make sure you put a piece of wood under your project while you are drilling. And, I did try punching a hole in the plastic before shrinking... But, since the hole shrinks too, I was having difficulty with the control I had over the size and placement and decided to use the drill instead.
-I added some jump rings (note to self: buy some bigger jump rings) and beads to some flex-wire and head pins and oooh-laa-laa, I have some fun and funky jewelry for October!
Now, you MUST check out the fabulous VIDEO that Tami put together to highlight all of the pink and orange projects. I'm proud to be a Fiskateer!

Saturday, October 16, 2010

NOT Lost in Translation


Over on the If It's Groovy blog, we were given a challenge to translate a phrase and create a layout with it. Here is my project...


Nothing fancy, because this time it is all about the precious picture of my daughter and our dog, Basso. Just using up some scraps of dog-themed paper and stickers on this irridescent pink patterned paper, some paper crimping, a title, and I'm done. I am a font fiend, and I love searching sites for free font downloads. I also have to give kudos to this website that I used to convert my title, www.freetranslation.com. I do not speak any foreign languages, but I can conjugate Latin verbs and decipher vocabulary (how useful is that?). My highschool Latin teacher would be so proud...semper ubi sub ubi (always wear underwear).

Monday, October 11, 2010

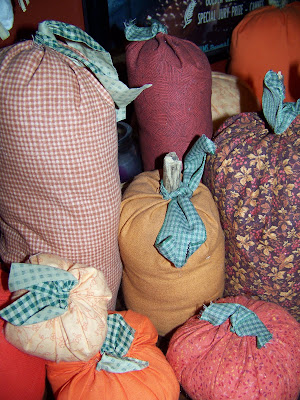
Pick-a Pick-a Pumpkin from the pile...and a "banner" Halloween


I made these pumpkins about 5 years ago, and even though they get squished into a plastic bin for storage after Halloween every year, they've held up very well. Except a few have gotten their "stem" pulled out by a Golden Retriever I know that likes to chew on sticks (we should have named him "Chip").

They are "sew" easy...I thought I would share them with you.

I start by using a bowl or template to draw a circle on some material, and then cut out the circle (I like to use pinking shears to avoid the un-ravelling edge).


I take a needle and thread and do a quick running stitch (in, out, in,out) all of the way around the edge. No need to be perfect here...no one will see your stitches.

I add a little "filling", pull the thread, add a stick for a stem, and tie it up.

I add some ribbon scraps for leaves/vines. After I've made a few pumpkins, in all different patterns, I take 3 or 4 and hot glue them together.

I've made my own pumpkin patch for a fall display in the family room and around the flower centerpiece on the dining room table. Let me see your pumpkin patch!

Fall is in the air, literally, in the air, hanging between rooms...I made this 2-sided Halloween banner for a challenge over in Fiskateerland a few weeks ago. I hung it up and was happy, but it just needed something more. I decided to tie on some scraps of fabric cut into strips, and now it is complete!

Monday, September 20, 2010

A scary sneak peak!


Boo! Are you scared? You will be when you see this very (not so scary) ATC I created for the Spooky Halloween swap over at Fiskateers. This little monster is cut from some fabulous Reminisce Monsters Collection patterned paper (I think I have to go get some more).

Wednesday, September 15, 2010

Calendar girls and "soups on"


These are the creations from my daughter's 13th birthday party. What a talented bunch!

Too many tomatoes from the garden? Here is a DELICIOUS recipe to use them all up! Putzy but worth it!

Tomato soup with basil dumplings

¼ C olive oil
2 large onions, sliced
2 garlic cloves, minced
2 carrots, peeled and finely diced
2 celery ribs, diced
1 sweet red pepper, seeded and diced
2 Tbsp fresh lemon juice
1 tsp sugar
3 C well-seasoned chicken stock
3 pounds very ripe fresh Italian plum tomatoes, peeled, seeded, and diced
1 Tbsp gin (optional)

1 C all-purpose flour
1 tsp baking powder
Salt and pepper to taste
3 eggs
2 Tbsp vegetable oil
¾ C torn fresh basil leaves

Heat olive oil in a large, heavy soup pot. Add onions and garlic. Sauté’ over medium heat, stirring occasionally, for 5 minutes. Add carrots, celery, red pepper, lemon juice, sugar, and chicken broth. Simmer for 15 minutes. Strain out vegetables; return broth to the pot. Puree vegetables in a food processor or blender and return to soup pot. Add tomatoes and gin; simmer for 10 minutes or until soup begins to thicken. Watch carefully and don’t allow it to burn.

Meanwhile-Get a large pot of water to a boil. Combine flour, baking powder, and ½ tsp salt in a large bowl. Add eggs and oil; beat until dough is sticky. Stir in ½ C basil. Drop dough by ½ teaspoons into the large pot of boiling water. Simmer dumplings, uncovered, until they rise to the surface and then 3 to 4 minutes longer, turning periodically, until they are cooked through. (Test one by cutting in half to be sure the center is no longer raw).

Drain dumplings in a colander, rinse under cold water, and drain again. Set aside until ready to add to the soup. Add dumpling to the hot soup and serve at once. Garnish with remaining basil.

Monday, September 13, 2010

ORANGE Blog Hop Winner(s)!

Yes--"winners". 100 comments!!! A new record! So, I decided to pick 2 winners.


Karin Hall said...
What a great project - very nice. Karin H #6470

joybear said...
Oh so pretty, I know she will enjoy it!!!

Karin and joybear--send me your addresses so I can mail you some goodies!
purplekellystar@aol.com

Thursday, September 9, 2010

ORANGE you glad today is the Fiskateer Blog Hop?


ORANGE you happy to be a Fiskateer? Get ready to bounce through the Fiskateer Blog Hop. If you came from the blog of Debby's Dare, you are in the right place. If not, go back to the Fiskateer blog so you start from the beginning and don't miss a "scrap" of ideas and fun.
Orange you thinking that September is a great time to make a calendar? Orange you ready to see what fabulous Fiskars tools I've used? Orange you hoping I stop over-using "orange"?

Here is my orange creation...I made this calendar as a sample for my daughter and her friends. It was their crafty project for my daughter's 13th birthday party. They all thought they would be perfect for hanging in their school lockers.

I rescued an 11"x17" piece of cardboard from the recycle bin and covered it with 2 sheets of 12x12 paper. I had the paper hang over the edges on the top and bottom and I used a hot glue gun to secure them. You can wrap the sides too, if you like, but I chose to cut it.
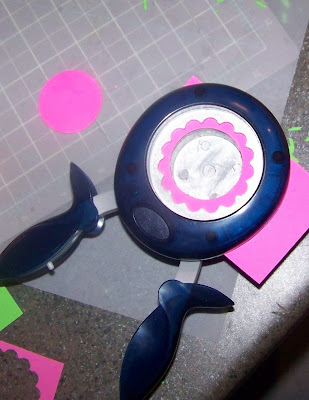
Next, I punched circles from cardstock (using my Round and Round squeeze punch)and then placed the negative paper (with the hole) into a scalloped circle punch (Seal of Approval) .
I centered the hole...
and made a "flower".

By mixing and matching punched circles (that I "popped" with Zots) and flower rings, I created a garden. With some Thickers, I spelled out my daughter's name for the top of the calendar. I added a bow too.


I had a blank calendar page (from Close to My Heart, but you could easily print one out from your computer) and slid it into a page protector (that I trimmed to fit on my 11" wide cardboard). You can put another blank calendar on the back side, so that you can lift it up and plan 2 months at a time.

Using my FAVORITE Fiskars border punch, Apron lace, I added some ORANGE patterned paper to my calendar to cover the place where I glued on the page protector to the cardboard. I also made a pocket at the bottom of the calendar to hold notes and other important "stuff". I added a ribbon at the bottom to slide on some paper clips--one more spot to hang notes.

Everything is better when Stickled, don't you think? A little sparkle makes these die-cut butterflies dazzly!
Since I used a page protector to cover the calendar, it is perfect for use with a dry-erase marker. Rachel is thrilled that I had to make a "sample" for the party, because this calendar is now hers. Won't her teacher be thrilled that she is so eager to practice her numbers?

Come back next week to see what the birthday party calendar artists created...what a talented bunch!

NOW, would you like some happy mail? Leave a comment, and I will pick on Sunday at 6pm (via Random.org) a lucky winner to receive some scrappy goodies.


Boing! Boing! Keep on hopping...next stop...Colleen Flathers at http://cleancreate.blogspot.com/.

If by some chance, you just happened to stop by my blog today and you have no idea what Fiskateers are or why I keep raving about ORANGE, let me explain. Fiskateers is an on-line community. Actually, it's a family. No, we are not related, but we have all come together to celebrate our love and appreciation for Fiskars products. Whether you love the endless scrapbooking supplies (squeeze punches, border punches, paper trimmers, micro-tip scissors, stamps), rotary cutters, garden tools, or their famous orange-handled scissors, Fiskateers is a place for you. At the website, inspiration is abundant. The site has a gallery of AMAZING creations by other Fiskateers, games, chats, swaps, tutorials, and 7000+ friends. It is a place for all things crafty (and sewing and gardening too). If you are interested in becoming a Fiskateer, click here. Contact one of the lead Fiskateers: Angela, Cheryl, Rebecca, or Tami (I listed them alphabetically so they think I don't play favorites), and tell them Kellystar sent you over. Your crafty life may never be the same.